Purpose of this article
The purpose of this article is to explain how to create SPD workflows which are portable using an approach as described in an previous post. I’ve written an small BETA tool to export, import and attach the workflows. The GUID replacement is not the most elegant approach, but is faster than rewriting Microsoft’s SPD activities. Anyway I wanted explain how it should work already.
UPDATE: The tool is live, more on this here: https://agiledirect.wordpress.com/2008/09/11/beta-spd-workflow-export-utility-on-codeplex/
Steps for getting it working
The best approach for working with the export workflows tool is as follows;
Preparation
- Design and create the lists you want to use for you workflow.
- Export these lists for packaging as you are used to when packaging lists into features, you should already know how to do so.
- Create an empty site (blank site for instance) to validate and instantiate the lists in using your created feature. This blank site will be your workspace for creating and exporting the SharePoint Designer workflow.
Actual workflow activities
- Open op SharePoint Designer and create the workflows for that lists in that instantiated site.
- Use the workflow export utility to export the workflows and generate the workflow feature XML
- Package the feature in to an WSP (using WSPBuilder for instance), add the SPDToolkit.Workflows.Foundation.DLL to the GAC directory of your WSP solution.
- Activate the lists feature on an (empty) site and activate the workflow feature. The workflow should now be added to the site and associated with the lists.
Preparation
Just for sample purposes I’ve created the very simple and silly “Beer Orders” and “Approved Beer Orders” lists in a site using the SharePoint UI. Both lists containing nothing more than just column with the default name ‘Title’. The idea of these list is that when user orders an beer with the Title “Heineken” it will immediately go to the approved orders (others will probably never be handled 🙂 ) . Maybe I will extend the sample later on to let it make more sense.

Now, since we want to use this lists in our workflow, and re-use them on multiple sites, it is important that we package the lists as an feature so we can activate the feature on multiple sites. Activating the feature will instantiate the lists on that particular site.
So, first we need to convert our UI generated list into a way that we can package it using solution packaging. There are quite some tools out there that can export lists to an list definition XML. You can use whatever tooling you want to create the list definition. I’ve used some self written logic to export the list definition and create the list instance feature.
The lists are both packaged in an feature cleverly called “Beer Lists Feature”
Since we have packaged the lists, we need to test whether the lists are correctly provisioned. We do this by creating an blank site and activating our “Beer Lists Feature”. When this is correctly provisioned we will use this site for creating our SPD workflows which we will export using our utility.
I’ve activated the “Beer Lists Feature” feature and instantiated the lists in an “Blank Site” which I created at http://litwaredemo:15000/BeerWorkspace/.
Creating the workflow
Now to create the SPD workflow we open up the site at http://litwaredemo:15000/BeerWorkspace/. We can use the new workflow option in SharePoint designer to create the workflow. The result looks a bit like this;

To explain what it does. The workflow checks whether an item is added to “Beer Orders” with the title “Heineken” (Case sensitive). If this is the case it will add an item to “Approved Beer Orders” for processing.
Exporting the workflow
We will now export our created workflow using the export workflow utility. This utility will export the workflow files and create an analyze XML file to which we can later recreate the workflow.
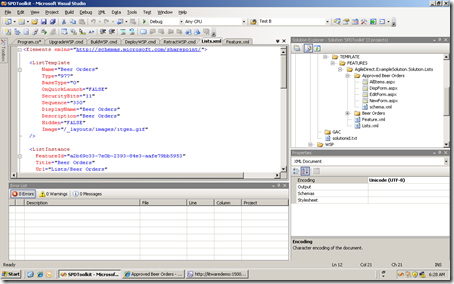
To export the workflow to a feature we use the following syntax:
SPDToolkit.Workflows.Utility.exe -path C:\Feature\ -name AgileDirect.ExampleSolution.Workflows -title Beer workflow -description Simple beer driven workflow A -url http://litwaredemo:15000/BeerWorkspace/
The arguments should be quite self-explanatory.
This will result in an feature like this;

Packaging it up
Now that we have the feature we need to package it. I use WSP builder, and the solution looks a bit like this in the end. You can see that its nothing more than copying the resulting feature in to the FEATURES folder of the WSP structure.
Now what we need to do is add our custom feature receiver to the GAC, so when the feature gets activated it will execute our custom feature receiver and add and the workflow to the site. To do this add it to the GAC folder of the WSPBuilder folder structure.

Now the feature needs to packaged into an WSP and an solution needs to be build, installed and deployed to an web-application. Again, I used WSPBuilder to do so.
Activating the workflows
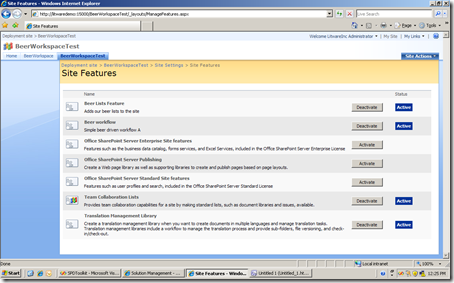
To activate the workflows, create an empty site.I called mine, http://litwaredemo:15000/BeerWorkspaceTest/ Activate the “Beer Lists Feature” and the “Beer workflow” feature next. Please note that activating could take quite some time (up to 20 seconds for the first time). This should activate and enable the workflows on that site.
Testing the workflows
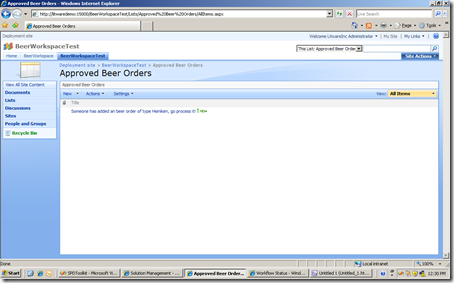
Add an item to the list “Beer Orders” with the name “Heineken” and you will see that the workflow gets triggered and an message gets added to the history, and an item get put in the “Approved Beer Orders”

And you can see the item has appeared on the other list “Approved Beer Orders” as well.
Make it easier for your clients using feature stapling
Don’t forget that you can feature staple the features together so that the user only needs to activate one feature.
What’s next?
Well, next I will upload the utility, and I will create an screen-cast to explain how to work with the tool and export workflows. If this is still a bit too complicated to comprehend.
Its out now: Check the post https://agiledirect.wordpress.com/2008/09/11/beta-spd-workflow-export-utility-on-codeplex/
A couple of features on my wish list.
- Create a CodePlex place for it, so I can upload the code and you guys can download and work with the tool.
- Add support for versioning of workflows
- More advanced support for workflows
- Fix some bugs
- Use the object model API instead of the webservice (avoids the long wait when activating)
Filed under: SharePoint Designer, Workflow | 9 Comments »